
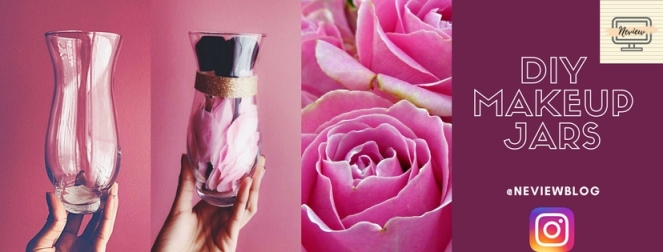
Hi, Neviewers!✌🏽 Today, I wanted to do something a little different from a review. I consider myself as a creative person- I prefer to make something, rather than buying it so that I can put my own personal twists on it. With that being said, I have quite a few makeup brushes but don’t have anywhere convenient to store them. Typically, I just shove them into my makeup bag but I wanted a change. I’m an active Pinterest user (follow me!) so I love getting inspired to take on new projects! I’ve been seeing a ton of makeup jars on my feed, which is when I decided to make my own.
 What did I use? ✂️
🏺Plastic Vase– Where: Dollar Tree — Price: $1 (I bought 3)
✨Glitter Paper– Where: Michaels — Price: $1.42 (I bought 1 piece- 1 is more than enough considering it’s a 12″ by 12″ sheet of cardstock and you’ll be using thin strips)
🌷Rose Petals– Where: Michaels — Price: $4.39 (These aren’t the exact ones I bought but they’re the closest I could find in style & price online)
🔫Hot Glue Gun– Where: Michaels — Price: $2.99 (This is an awesome glue gun! Love the size)
🍯Mini Glue Sticks– Where: Michaels — Price: $3.00
💲I spent around a total of $14 (This will vary)
📄 NOTE: Remember you can find these items at a majority of craft stores, not just the ones listed above. Also, keep quantity in mind- I bought 3 vases, which is why I only needed one piece of glitter paper, one bag of rose petals, and mini glue sticks.
Let’s get started! 🛠

1. Get your materials together- I like doing DIY projects on the ground so I have plenty of space. Get a pair of scissors, a pencil, and a tape measure. Plug your glue gun in now so it can heat up while you do the next few steps.
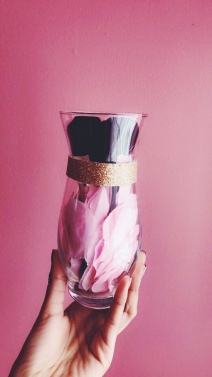
2. Using the tape measure, measure around the “neck” of the vase as shown in the picture to the right. Measure in inches. This measurement will indicate how long of a cardstock strip you will need.
3. After getting the measurement, take your glitter cardstock and beginning at any of the four corners, lay your tape measure down and make a mark at the designated inch length. As for thickness, that depends on you– I didn’t want it too thick so I had a width of about 1 inch. Cut as many strips as needed.

4. The glue gun should be hot enough by now. Flip the strip to the opposite side (there should be no glitter on this side) and apply hot glue over it- make sure to get the corners and edges! Carefully picking it up, place the side with glue around the neck of the vase. Press down on the strip once you are satisfied with the placement (apply pressure while pressing down for about 30-40 seconds or until it feels secure).
5. Congratulations! The hardest part is officially done. You can wait a few minutes if you want to make sure the glue has completely dried. Now for the easy part- open up that bag of rose petals and throw in your desired amount of petals into the vase. Add in your brushes and you’re all set! 💁🏽♀️

And there you have it! 🌟
You now have new, stylish makeup jars. How quick and easy was that? I love the classy look they give off- not too much going on, but just enough! I thought about adding in a few pearls at the bottom but decided not to.
Hope you guys liked this step-by-step tutorial. Like I mentioned before, I’m all about that DIY life– so I plan to share more of my projects with you all in the future! My DIY projects don’t just focus on makeup (tbh, this is actually my first makeup inspired DIY). What did you think of this project? Are you going to try making your own makeup jars? Have any questions? Leave me a comment and I’ll respond asap. Until next time, Neviewers!
As always, likes/comments/follows are appreciated 💋

Great diy! I share the same interest as far as making my own things. Its just better adding your own twist on things. 🙂 Thank you for sharing.
LikeLiked by 1 person
Aw, thank you love! 💕 Personalizing things is honestly the best- so much more fun! Thanks for the sweet comment 😘
LikeLike
they are so cute and would be a perfect gift!
LikeLiked by 1 person
I didn’t even think of that! They would surely be a great gift 🎁 Homemade gifts are always more meaningful than store bought 💕 Thanks for the sweet comment!
LikeLiked by 1 person
Very creative and cute. Great gift idea
LikeLiked by 1 person
Thanks love! 💕 It was really fun to make. I love glitter and flower petals! 🌷
LikeLiked by 1 person
How pretty! I love the petals!
LikeLiked by 1 person
Why thank you, love! 💕
LikeLiked by 1 person
So creative!! I will have to try this.
LikeLiked by 1 person
Thank you 💕 Let me know how it goes if you end up trying it!
LikeLiked by 1 person
Will do!
LikeLiked by 1 person
Wow this is a great idea!! I definitely need to do this! 😁Thanks so much for sharing this and for following me 😘 xxx
https://thebeautyfaze.com
LikeLiked by 1 person
Aw, thank you so much 😘 You’re such a sweetheart- likewise! ❤️
LikeLike
So cute, what a brilliant idea! Looks straightforward enough for me to try making one of these so thanks for sharing – will save this post and give it a go on the weekend as I need a crafty project to do 🙂
Caz xx
LikeLiked by 1 person
Aw, thank you so much! ❤ Let me know how it goes, love 🙂
LikeLiked by 1 person
So creative 😍 I love love love this.
LikeLiked by 1 person
You are too sweet! Thanks, love 😘
LikeLiked by 1 person
Awww You’re welcome ❤️
LikeLiked by 1 person
Jars are amazing 😍
LikeLiked by 1 person
Awh, thank you! 😘
LikeLike
Nifty!
LikeLiked by 2 people
Thanks, love! ❤
LikeLiked by 2 people